Pages

Tuesday, July 9, 2013

Create custom Reports in Magento Admin

Want to create a custom report in Magento Admin?

After taking help from some forums & all I was able to generate a new Report the way I wanted.

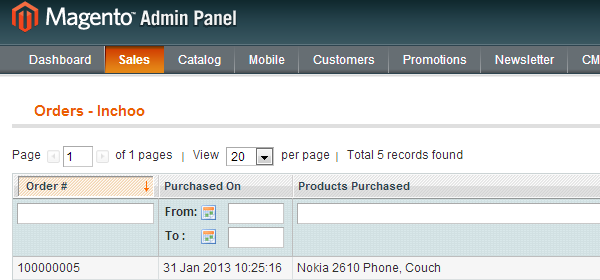
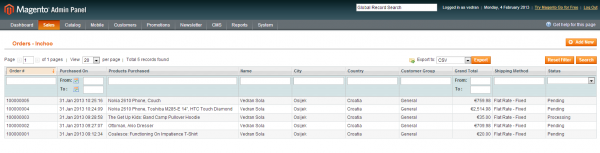
I was looking to generate the Report for the Products sold along with the name of the Artist to whom the product belongs to.

These are the steps to be followed / I followed.

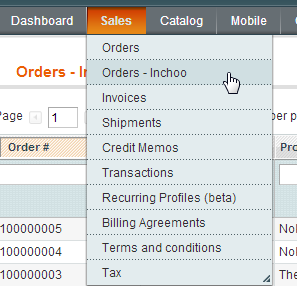
1. The title of the report is: ‘Artist Sold Works’. To add the new item under the Reports -> Products.

Open the ‘app/code/code/Mage/Reports/etc/config.xml’

Add the followind code in the ‘children of ‘products’ (near line 221).
    <title>Artist Sold Works</title>
    adminhtml/report_product/artistsold

Add the followind code in the of
(near line 370).
    <title>Artists Sold Works</title>

 Copy files

app/code/core/Mage/Adminhtml/Block/Report/Product/Sold.php to app/code/core/Mage/Adminhtml/Block/Report/Product/Artistsold.php.

 Copy directories

app/code/core/Mage/Adminhtml/Block/Report/Product/Sold to

app/code/core/Mage/Adminhtml/Block/Report/Product/Artistsold

app/code/core/Mage/Reports/Model/Mysql4/Product/Sold to

app/code/core/Mage/Reports/Model/Mysql4/Product/Artistsold

4. In the file Artistsold.php, change the class name from

Mage_Adminhtml_Block_Report_Product_Sold to Mage_Adminhtml_Block_Report_Product_Artistsold.

Change the lines
    $this->_controller = 'report_product_sold';
    $this->_headerText = Mage::helper('reports')->__('Products Ordered');

to
    $this->_controller = 'report_product_artistsold';
    $this->_headerText = Mage::helper('reports')->__('Artist Sold Works');

5. Add/Modify the columns in the

app/code/core/Mage/Adminhtml/Block/Report/Product/Artistsold/Grid.php

Here in my case:
    $this->addColumn('artistId', array(
        'header'    =>Mage::helper('reports')->__('Artist'),
        'width'     =>'120px',
        'index'     =>'artistname',
    ));  
    
    $this->addColumn('sale_percentage', array(
        'header'    =>Mage::helper('reports')->__('Artist Share'),
        'width'     =>'60px',
        'index'     =>'sale_percentage',
        'align'     =>'right'
    ));
    
    $this->addColumn('base_price_total', array(
        'header'    =>Mage::helper('reports')->__('Total Product Base Price ($)'),
        'width'     =>'60px',
        'index'     =>'base_price_total',
        'align'     =>'right',
        'total'     =>'sum',
        'type'      =>'number'
    
    ));
    
    $this->addColumn('artist_earned', array(
        'header'    =>Mage::helper('reports')->__('Artist Earned ($)'),
        'width'     =>'60px',
        'index'     =>'artist_earned',
        'align'     =>'right',
        'total'     =>'sum',
        'type'      =>'number'
    ));
6. Add new functions to

app/code/core/Mage/Adminhtml/controllers/Report/ProductController.php
    public function artistsoldAction()
    {
        $this->_initAction()
            ->_setActiveMenu('report/product/artistsold')
            ->_addBreadcrumb(Mage::helper('reports')->__('Artists Sold Works'), Mage::helper('reports')->__('Artists Sold Works'))
            ->_addContent($this->getLayout()->createBlock('adminhtml/report_product_artistsold'))
            ->renderLayout();
    }
7. Open the file
    app/code/core/Mage/Reports/Model/Mysql4/Product/Artistsold/Collection.php.

Rename the class name from

Mage_Reports_Model_Mysql4_Product_Sold_Collection to

Mage_Reports_Model_Mysql4_Product_Artistsold_Collection

Customize the function setDateRange() in the as per your need.

Here in my case:
    public function setDateRange($frmdate, $todate)
    {
        $this->_reset()
            ->addAttributeToSelect('*')
            ->addOrderedQtyForArtistSold($frmdate,$todate);
        return $this;
    }
8. To get the new fields, to alter the sql query I copied the function addOrderedQty() to addOrderedQtyForArtistSold() in the file
  app/code/core/Mage/Reports/Model/Mysql4/Product/Collection.php

And I did changes in the functions as per my need to get the extra columns.

Here in my case:
    public function addOrderedQtyForArtistSold($frm = '', $to = '')
   {
    if(key_exists('report',$_SESSION)) {
           $artistId = $_SESSION['report']['artistid'];
    }
    else {
        $artistId ='';
    }

       $qtyOrderedTableName = $this->getTable('sales/order_item');
       $qtyOrderedFieldName = 'qty_ordered';

       $productIdTableName = $this->getTable('sales/order_item');
       $productIdFieldName = 'product_id';

    $productEntityIntTable = (string)Mage::getConfig()->getTablePrefix() . 'catalog_product_entity_varchar';
    $adminUserTable = $this->getTable('admin_user');
    $artistsTable = $this->getTable('appartists');
    $eavAttributeTable = $this->getTable('eav/attribute');

       $compositeTypeIds = Mage::getSingleton('catalog/product_type')->getCompositeTypes();

       # This was added by Dev1 to get the configurable items in the list & not to get the simple products
       $compositeTypeIds = Array (
                        '0' => 'grouped',
                        '1' => 'simple',
                        '2' => 'bundle'
                        );

       $productTypes = $this->getConnection()->quoteInto(' AND (e.type_id NOT IN (?))', $compositeTypeIds);

       if ($frm != '' && $to != '') {
           $dateFilter = " AND `order`.created_at BETWEEN '{$frm}' AND '{$to}'";
       } else {
           $dateFilter = "";
       }

       $this->getSelect()->reset()->from(
          array('order_items' => $qtyOrderedTableName),
          array('ordered_qty' => "SUM(order_items.{$qtyOrderedFieldName})",'base_price_total' => "SUM(order_items.price)")
       );

       $order = Mage::getResourceSingleton('sales/order');

       $stateAttr = $order->getAttribute('state');
       if ($stateAttr->getBackend()->isStatic()) {

           $_joinCondition = $this->getConnection()->quoteInto(
               'order.entity_id = order_items.order_id AND order.state<>?', Mage_Sales_Model_Order::STATE_CANCELED
           );
           $_joinCondition .= $dateFilter;

           $this->getSelect()->joinInner(
               array('order' => $this->getTable('sales/order')),
               $_joinCondition,
               array()
           );
       } else {

           $_joinCondition = 'order.entity_id = order_state.entity_id';
           $_joinCondition .= $this->getConnection()->quoteInto(' AND order_state.attribute_id=? ', $stateAttr->getId());
           $_joinCondition .= $this->getConnection()->quoteInto(' AND order_state.value<>? ', Mage_Sales_Model_Order::STATE_CANCELED);

           $this->getSelect()
               ->joinInner(
                   array('order' => $this->getTable('sales/order')),
                   'order.entity_id = order_items.order_id' . $dateFilter,
                   array())
               ->joinInner(
                   array('order_state' => $stateAttr->getBackend()->getTable()),
                   $_joinCondition,
                   array());
       }

       $this->getSelect()
           ->joinInner(array('e' => $this->getProductEntityTableName()),
               "e.entity_id = order_items.{$productIdFieldName}")
            ->group('e.entity_id')
           ->having('ordered_qty > 0');

       $artistIdConcat = $artistId != '' ? " AND artistId=$artistId" : "";

       $this->getSelect()
           ->joinInner(
               array('pei' => $productEntityIntTable),
               "e.entity_id = pei.entity_id",
               array())
           ->joinInner(
               array('ea' => $eavAttributeTable),
               "pei.attribute_id=ea.attribute_id AND ea.attribute_code='artistid'",
               array())
           ->joinInner(
               array('au' => $adminUserTable),
               "au.user_id=pei.value",
               array("artistname" => "CONCAT(firstname, ' ',lastname)"))
           ->joinInner(
               array('ar' => $artistsTable),
               "ar.artistId=au.user_id".$artistIdConcat,
               array("sale_percentage" => "CONCAT(sale_percentage,'%')","artist_earned" => "((SUM(order_items.price)) * (sale_percentage)) / 100"));

       return $this;
   }


Monday, July 8, 2013

Magento directory structure for Module development

TO develop a module for magento first and fore most we have to under stand the directory structure of the magento so for this first just have an over view of the magento directory structure

1) first directory stucture to declare our module for this we have to add an xml file which declares our magento module. It  recides in magentoroot/app/etc/modules/ your xml file should of name <company name>_<module name>.xml

2)after this you have to main code directory strture to define your module for this first go to the folder app/code now according to your module type (we have 3 types of modules core created and managed by magento it self community created and managed by community developers and 3 one is local 3rd party modules ) got into specified directory example go in local folder after this first create folder with your company as dexlared in xml file inside that folder you have to create a new folder with module name .

3)After this when your in your module folder now you have create direcories according to your need diifrent types of directories inside your module folder are

    Block (to generate out to user end it interacts with the .phtml to provide out put to end users)
   controller(it acts as controoler and interacts between model files and view file in magento defines url actions)
   Model (all database functions and mapping is defined under this directory)
   etc(it contains the definition of your module which includes config.xml ,system.xml etc)
   sql(this icludes sql installer file which runs automatically after installation of module )

4) Beside this we can our js files to js folder css files to css folder.To add extra images and css files go to skin/frontend/<yourtheme>/<theme>/<create new folder>/ place extra files to this folder

5) now to call extra file use php function $this->getSkinUrl('path to extra file');

6) to define your module layout go to app/design/frontend/<yourtheme>/<theme>/layout/<layout xml file for module>

7) Similarly for defining new phtml files for your theme go to app/design/frontend/<yourtheme>/<theme>/template/ and defines you phtml files here.

Magento display brand image on product

Hey as many of the user wants to have this feature and for this just us the following method first thing is to  get the data for brand
we can have the data for product bran using the php code

$brand=$_product->getAttributeText('manufacturer'); // here manufacture is attribute code for brand

Now you have to get path for brand image to do this locate path to your brand images

$filename= '/var/www/vhosts/***path to folder***/media/catalog/brands/'.str_replace(' ', '_',$brand).'.gif';

Now just print the brand image at desired location
echo '<a href="/'.str_replace(' ', '_',$brand).'"><img style="float: right; margin: 2px;" src="/media/catalog/brands/'.str_replace(' ', '_',$brand).'.gif" alt="'.$brand.'"></a>'

Magento Code to get Store Information

Most of the time we want to access Store Contact info at different places of our magento site to do this we have a very simple and useful code i.e
<?php echo Mage::getStoreConfig('general/store_information');    ?>

This code will fetch you an array containing complete store which is provided at backend From System->Configuration->General->Store Information.

If do not Want the complete array or just want to use address info use

<?php echo Mage::getStoreConfig('general/store_information/address');    ?>

In similar fashion for store phone number use this code

<?php echo Mage::getStoreConfig('general/store_information/phone'); ?>  

Magento new feature for Category manager

Magento 1.5 has come up with anew feature for categories and made category design management a lot more easier now when you click on a category and apply a custom or a new design for a particular category you can extend that design for its sub categories and products by just selecting the use parent category settings and apply to products.

Magento How to remove Top menu

Many time during design and development of magento theme we require to
remove default top menu  bar of magento to do that we just have to add

<reference name="header">
<action method="unsetChild"><alias>topMenu</alias></action>
</reference>

where we want to remove the top menu i.e if we have to update the layout
for the specified pages and have to just unset the the top menu from reference head

to remove top menu from all the pages just remove or comment the following lines

from page.xml pf your theme


 <block type="core/text_list" name="top.menu" as="topMenu" translate="label">
                <label>Navigation Bar</label>
  </block>

Magento Google Checkout

 Go System->Configuration->Google API->Google Checkout
Enable Google Checkout and other configurations set details about your google checkout like merchant id, merchant key etc. Save the configuration.

You Can Go to google checkout sandbox testing platform and can easily test about google checkout

you need to have a seller merchant account and buy account to test it both of this account can be created from   google checkout sandbox just provide sample or proxy data of the users and after this you are ready to test your google checkout integrated with magento  on the sandbox platform with no real money transfer but it will stimulate the exact scenario after test you can make it live but changing the configuration to live from backend.

How to create a custom grid from scratch

inchoo orders
We received a request from a client where they wanted to implement an expanded order grid while still keeping the default Magento’s one. For this example we’ll create a new module namedabcefg Orders.

Step 1.

Create new module in etc/modules calledabcefg_Orders.xml
   
<?xml version="1.0"?>
<config>
    <modules>
        <Inchoo_Orders>
            <active>true</active>
            <codePool>community</codePool>
        </Inchoo_Orders>
    </modules>
</config>

Step 2.

Next thing we’ll do is create folderabcefg/Orders inside app/code/community and inside we’ll make few folders: Block, controllers, etc, Helper.

inchoo_orders

Step 3.

Create config.xml inside etc folder.

   
<?xml version="1.0"?>
<config>
    <modules>
        <Inchoo_Orders>
            <version>0.0.0.1</version>
        </Inchoo_Orders>
    </modules>
    <global>
        <models>
            <inchoo_orders>
                <class>Inchoo_Orders_Model</class>
                <resourceModel>inchoo_orders_resource</resourceModel>
            </inchoo_orders>
        </models>
        <resources>
            <inchoo_orders_setup>
                <setup>
                    <module>Inchoo_Orders</module>
                </setup>
            </inchoo_orders_setup>
        </resources>
        <blocks>
            <inchoo_orders>
                <class>Inchoo_Orders_Block</class>
            </inchoo_orders>
        </blocks>
        <helpers>
            <inchoo_orders>
                <class>Inchoo_Orders_Helper</class>
            </inchoo_orders>
        </helpers>
    </global>
    <admin>
        <routers>
            <adminhtml>
                <args>
                    <modules>
                        <inchoo_orders before="Mage_Adminhtml">Inchoo_Orders_Adminhtml</inchoo_orders>
                    </modules>
                </args>
            </adminhtml>
        </routers>
    </admin>
</config>

Step 4

Create adminhtml.xml file inside etc folder which will add a link to our orders page in magento admin panel.

   
<?xml version="1.0"?>
<config>
    <menu>
        <sales>
            <children>
                <inchoo_orders translate="title" module="inchoo_orders">
                    <sort_order>10</sort_order>
                    <title>Orders -abcefg</title>
                    <action>adminhtml/order/</action>
                </inchoo_orders>
            </children>
        </sales>
    </menu>
</config>

Step 5

Create blank helper class.

   
<?php
classabcefg_Orders_Helper_Data extends Mage_Core_Helper_Abstract
{
}

Step 6

Next step is to create controller for our grid.
   
<?php
classabcefg_Orders_Adminhtml_OrderController extends Mage_Adminhtml_Controller_Action
{
    public function indexAction()
    {
        $this->_title($this->__('Sales'))->_title($this->__('Ordersabcefg'));
        $this->loadLayout();
        $this->_setActiveMenu('sales/sales');
        $this->_addContent($this->getLayout()->createBlock('inchoo_orders/adminhtml_sales_order'));
        $this->renderLayout();
    }
    public function gridAction()
    {
        $this->loadLayout();
        $this->getResponse()->setBody(
            $this->getLayout()->createBlock('inchoo_orders/adminhtml_sales_order_grid')->toHtml()
        );
    }
    public function exportInchooCsvAction()
    {
        $fileName = 'orders_inchoo.csv';
        $grid = $this->getLayout()->createBlock('inchoo_orders/adminhtml_sales_order_grid');
        $this->_prepareDownloadResponse($fileName, $grid->getCsvFile());
    }
    public function exportInchooExcelAction()
    {
        $fileName = 'orders_inchoo.xml';
        $grid = $this->getLayout()->createBlock('inchoo_orders/adminhtml_sales_order_grid');
        $this->_prepareDownloadResponse($fileName, $grid->getExcelFile($fileName));
    }
}

Step 7

Next thing we do is create grid container in Block/Adminhtml/Sales/Order.php
   
<?php
classabcefg_Orders_Block_Adminhtml_Sales_Order extends Mage_Adminhtml_Block_Widget_Grid_Container
{
    public function __construct()
    {
        $this->_blockGroup = 'inchoo_orders';
        $this->_controller = 'adminhtml_sales_order';
        $this->_headerText = Mage::helper('inchoo_orders')->__('Orders -abcefg');
        parent::__construct();
        $this->_removeButton('add');
    }
}

Step 8

Last step is making grid class in Block/Adminhtml/Sales/Order/Grid.php
   
<?php
classabcefg_Orders_Block_Adminhtml_Sales_Order_Grid extends Mage_Adminhtml_Block_Widget_Grid
{
    public function __construct()
    {
        parent::__construct();
        $this->setId('inchoo_order_grid');
        $this->setDefaultSort('increment_id');
        $this->setDefaultDir('DESC');
        $this->setSaveParametersInSession(true);
        $this->setUseAjax(true);
    }
    protected function _prepareCollection()
    {
        $collection = Mage::getResourceModel('sales/order_collection')
            ->join(array('a' => 'sales/order_address'), 'main_table.entity_id = a.parent_id AND a.address_type != \'billing\'', array(
                'city'       => 'city',
                'country_id' => 'country_id'
            ))
            ->join(array('c' => 'customer/customer_group'), 'main_table.customer_group_id = c.customer_group_id', array(
                'customer_group_code' => 'customer_group_code'
            ))
            ->addExpressionFieldToSelect(
                'fullname',
                'CONCAT({{customer_firstname}}, \' \', {{customer_lastname}})',
                array('customer_firstname' => 'main_table.customer_firstname', 'customer_lastname' => 'main_table.customer_lastname'))
            ->addExpressionFieldToSelect(
                'products',
                '(SELECT GROUP_CONCAT(\' \', x.name)
                    FROM sales_flat_order_item x
                    WHERE {{entity_id}} = x.order_id
                        AND x.product_type != \'configurable\')',
                array('entity_id' => 'main_table.entity_id')
            )
        ;
        $this->setCollection($collection);
        parent::_prepareCollection();
        return $this;
    }
    protected function _prepareColumns()
    {
        $helper = Mage::helper('inchoo_orders');
        $currency = (string) Mage::getStoreConfig(Mage_Directory_Model_Currency::XML_PATH_CURRENCY_BASE);
        $this->addColumn('increment_id', array(
            'header' => $helper->__('Order #'),
            'index'  => 'increment_id'
        ));
        $this->addColumn('purchased_on', array(
            'header' => $helper->__('Purchased On'),
            'type'   => 'datetime',
            'index'  => 'created_at'
        ));
        $this->addColumn('products', array(
            'header'       => $helper->__('Products Purchased'),
            'index'        => 'products',
            'filter_index' => '(SELECT GROUP_CONCAT(\' \', x.name) FROM sales_flat_order_item x WHERE main_table.entity_id = x.order_id AND x.product_type != \'configurable\')'
        ));
        $this->addColumn('fullname', array(
            'header'       => $helper->__('Name'),
            'index'        => 'fullname',
            'filter_index' => 'CONCAT(customer_firstname, \' \', customer_lastname)'
        ));
        $this->addColumn('city', array(
            'header' => $helper->__('City'),
            'index'  => 'city'
        ));
        $this->addColumn('country', array(
            'header'   => $helper->__('Country'),
            'index'    => 'country_id',
            'renderer' => 'adminhtml/widget_grid_column_renderer_country'
        ));
        $this->addColumn('customer_group', array(
            'header' => $helper->__('Customer Group'),
            'index'  => 'customer_group_code'
        ));
        $this->addColumn('grand_total', array(
            'header'        => $helper->__('Grand Total'),
            'index'         => 'grand_total',
            'type'          => 'currency',
            'currency_code' => $currency
        ));
        $this->addColumn('shipping_method', array(
            'header' => $helper->__('Shipping Method'),
            'index'  => 'shipping_description'
        ));
        $this->addColumn('order_status', array(
            'header'  => $helper->__('Status'),
            'index'   => 'status',
            'type'    => 'options',
            'options' => Mage::getSingleton('sales/order_config')->getStatuses(),
        ));
        $this->addExportType('*/*/exportInchooCsv', $helper->__('CSV'));
        $this->addExportType('*/*/exportInchooExcel', $helper->__('Excel XML'));
        return parent::_prepareColumns();
    }
    public function getGridUrl()
    {
        return $this->getUrl('*/*/grid', array('_current'=>true));
    }
}

Our new custom orders page can be accessed by going to Sales -> Orders –abcefg in admin panel.

link in admin

End result should be something like this:

inchoo orders grid

How to add Currency selector to Magento’s header

Since Magento has built in functionality for currencies, it shouldn’t be too hard to create custom currency selector and put it to the header. You might say this tutorial is for beginners, since it’s pretty much straightforward.

You might have noticed the ”Currency Setup” tab in Magento’s Administration under “System->Configuration” menu. There you should select default site currency, and besides that, all currencies you want to support.
Here’s a screenshot of that tab:

After that, you should go to “System->Manage Currency Rates” and set rates for currencies you’ve chosen before. You can use Webservicex to import currency rates from Webservicex service. Here’s how it looks like:


And now, after you’re done with initial setup, let’s go further with modifications to make that output shows in the header. First thing you should do is to create a new template file and put it under “YOUR_PACKAGE/YOUR_THEME/template/currency/currency.phtml”. Put in this content:
   
<?php if($this->getCurrencyCount() > 1): ?>
<div class="form-language">
    <label for="custom-currency-selector"><?php echo $this->__('Your Currency:') ?></label>
    <select onchange="window.location.href=this.value" name="custom-currency-selector" id="custom-currency-selector">
        <?php foreach ($this->getCurrencies() as $_code => $_name): ?>
        <option value="<?php echo $this->getSwitchCurrencyUrl($_code)?>"
            <?php if($_code == $this->getCurrentCurrencyCode()): ?>
                selected="SELECTED"
            <?php endif; ?>>
            <?php echo $_code ?>
        </option>
        <?php endforeach; ?>
    </select>
</div>
<?php endif; ?>

You can put in line #10 either $_name or $_code, depending what do you want to show in your currency selector.
Here you can see how these changes affect to the selector.

Next thing you should do is to tell Magento which template should be used for the selector. You should create “YOUR_PACKAGE/YOUR_THEME/layout/local.xml”, or just append the following content if you already have this file in your theme.
   
<?xml version="1.0"?>
<layout version="0.1.0">
    <default>
        <reference name="header">
            <block type="directory/currency" name="custom_currency_selector" template="currency/currency.phtml"/>
        </reference>
    </default>
</layout>

And finally, there’s one more thing you’ll need to do to make the template visible on frontend, Open “YOUR_PACKAGE/YOUR_THEME/template/page/html/header.phtml” (or create new file if there isn’t any) and add the following content:
   
<div class="header-container">
    <div class="header">
        <?php if ($this->getIsHomePage()):?>
        <h1 class="logo"><strong><?php echo $this->getLogoAlt() ?></strong><a href="<?php echo $this->getUrl('') ?>" title="<?php echo $this->getLogoAlt() ?>" class="logo"><img src="<?php echo $this->getLogoSrc() ?>" alt="<?php echo $this->getLogoAlt() ?>" /></a></h1>
        <?php else:?>
        <a href="<?php echo $this->getUrl('') ?>" title="<?php echo $this->getLogoAlt() ?>" class="logo"><strong><?php echo $this->getLogoAlt() ?></strong><img src="<?php echo $this->getLogoSrc() ?>" alt="<?php echo $this->getLogoAlt() ?>" /></a>
        <?php endif?>
        <div class="quick-access">
            <?php echo $this->getChildHtml('topSearch') ?>
            <p class="welcome-msg"><?php echo $this->getWelcome() ?> <?php echo $this->getAdditionalHtml() ?></p>
            <?php echo $this->getChildHtml('topLinks') ?>
            <?php echo $this->getChildHtml('store_language') ?>
            <!-- START How to add Currency selector to Magento's header -->
            <?php echo $this->getChildHtml('custom_currency_selector') ?>
            <!-- END   How to add Currency selector to Magento's header -->
        </div>
        <?php echo $this->getChildHtml('topContainer'); ?>
    </div>
</div>
<?php echo $this->getChildHtml('topMenu') ?>

After this, if you save everything, clear the cache and reload the page, you should see something like this:

Note!

By default, Magento is configured to show default currency selector if there is more than one currency set up. You can see that below:

To disable default currency selector you need to add
   
<remove name="currency" />

to default handle in your layout.xml. Then, your local.xml would look like this:
   
<?xml version="1.0"?>
<layout version="0.1.0">
    <default>
        <reference name="header">
            <block type="directory/currency" name="custom_currency_selector" template="currency/currency.phtml"/>
        </reference>
        <remove name="currency" />
    </default>
</layout>

I hope this helped someone, cheers!

Move a category programmatically

The solution was quite simple, this one doesn't mess up the paths. However it feels like this method is slower.

$categoryId = 2269;
$parentId = 2268;

$category = Mage::getModel('catalog/category')->load($categoryId);
$category->move($parentId, null);